Craft by Amanda's blog has a wondrous tutorial on how to make some unbelievably adorable garland for the house or tree! We cannot wait to make these and show them off in our office cubicle (Holiday Cubicle Decorating Contest, here we come)!
Check out her blog - she has some amazing things!


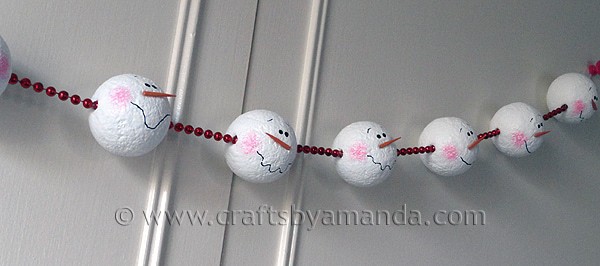
For this garland I used a bag of 2 inch Styrofoam balls and some Magikote. In case you haven’t heard of Magikote yet, it’s a product developed by Decoart
that gives Styrofoam a paintable, sandable surface. I love working with
these two items.

For
this project, I gave each ball a good coat of Magikote. Now Magikote
requires a solid 2-3 hours of drying time, so plan ahead. After the
first coat I added a second. When they were dry, I sanded the balls to
get rid of the rough edges. Then I inserted a toothpick into each ball
(which goes right into the Magikote without cracking or anything, just
like corkboard) and placed them in floral foam blocks. And that’s where
they sat for about 3 weeks!

I used some red
Mardi Gras beads I had sitting around. I measured them first and figured
out how many sections I would need. After cutting the beads into
sections, I used my thumb to press the end bead into the hole that the
toothpick had been in. To coax that bugger in there more, I applied firm
but gentle pressure with the eraser of a pencil. Once it was firmly
inside the ball, I removed it and added some hot glue.
 Then
I was able to easily press the end bead back into the hole. I did this
for all of the balls. When done with each individual ball, I connected
them all to each other using the same method. Then I looped some ribbon
and inserted them into the end heads to create the hangers. To make sure
that the faces were all facing the same way, I hung the garland up
temporarily.
Then
I was able to easily press the end bead back into the hole. I did this
for all of the balls. When done with each individual ball, I connected
them all to each other using the same method. Then I looped some ribbon
and inserted them into the end heads to create the hangers. To make sure
that the faces were all facing the same way, I hung the garland up
temporarily. Next
I cut orange toothpicks in half (I have several boxes of colored
toothpicks, not sure if you can get them anymore, but you could always paint
plain ones.) then trimmed them down a bit to get them to the size that I
wanted. While the garland was hanging up I hot glued the noses on. Then
I took the garland down to finish decorating. I applied pressure to the
noses to create an indent and sink them into the ball a bit. Then I
used a scruffy brush and Americana Pink Bubblegum paint to add the cheeks. I used a fine point Sharpie to add the mouths and eyebrows and the handle end of a paintbrush dipped in black paint for the eyes.
Next
I cut orange toothpicks in half (I have several boxes of colored
toothpicks, not sure if you can get them anymore, but you could always paint
plain ones.) then trimmed them down a bit to get them to the size that I
wanted. While the garland was hanging up I hot glued the noses on. Then
I took the garland down to finish decorating. I applied pressure to the
noses to create an indent and sink them into the ball a bit. Then I
used a scruffy brush and Americana Pink Bubblegum paint to add the cheeks. I used a fine point Sharpie to add the mouths and eyebrows and the handle end of a paintbrush dipped in black paint for the eyes. That’s it. Once they were dry I hung it up again and sprayed two coats (dried in between) of acrylic matte sealer.
No comments:
Post a Comment